
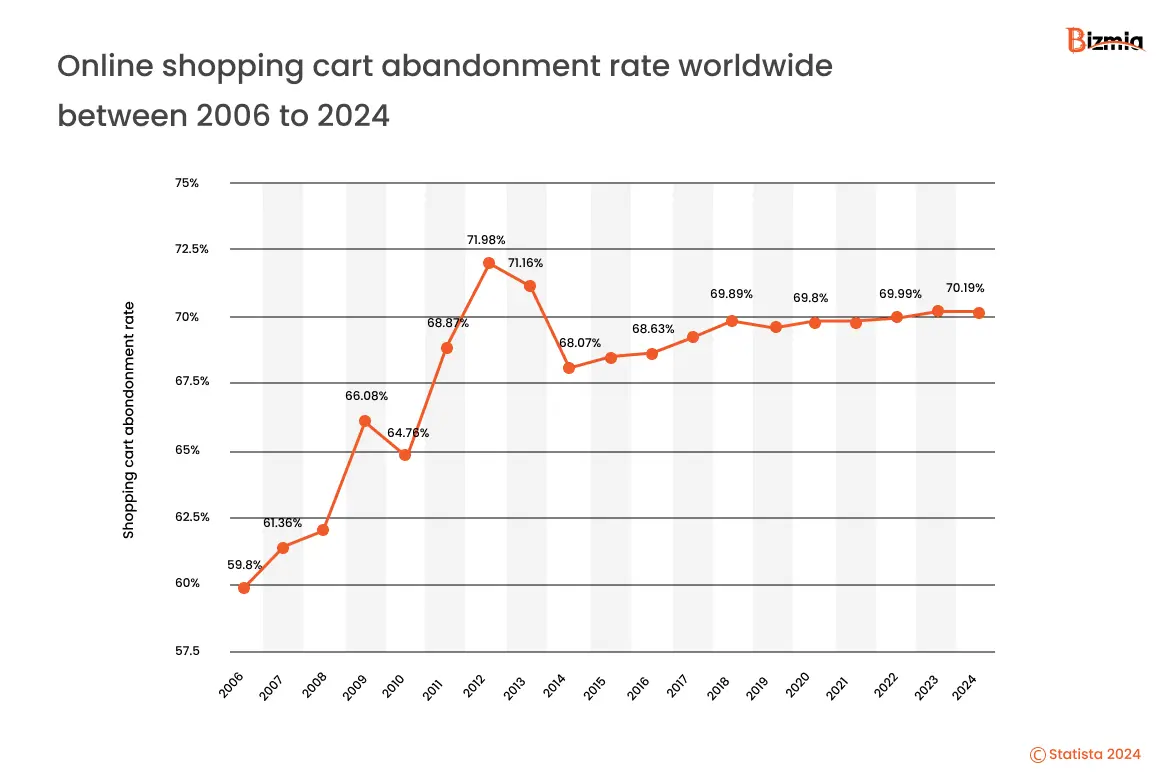
One of the biggest challenges that online stores and eCommerce business owners face is the high cart abandonment rate that leads to less sales. Checkout is the most critical aspect of any online business; therefore, it should be simple, user-friendly and customized for the users, so they do not press the ‘back’ button instead complete their Magento 2 checkout customization process. The recent stats of cart abandonment rate shared by Statista are as follows.
Out of many eCommerce platforms, Magento 2 checkout customization is the real problem-solver that retains users on checkout, simplifies the process, and customizes it according to user preferences.
This blog focuses on step-by-step Magento 2 checkout customization that enables developers to create the best checkout experience for the users.
Table of Contents
Magento 2 Checkout Customization Step-by-Step Process
To bring customization to your Magento 2 checkout customization page, here is a detailed process to follow.
1- Backup Magento Store
Before you start making changes, make sure that you have all the backup of your current Magento store, so nothing gets lost. This means saving your store’s information, like its database, files, themes, and pictures, in different safe places. Test that you can bring back this information if something goes wrong by trying it out on a test version of your store. By doing this, you keep your store’s important stuff safe while you make changes.
2- Create a Custom Checkout Step Component
- In order to create a custom module for Magento 2 checkout, connect to your Magento 2 server via SSH or open your local Magento 2 directory. The next step is to navigate to the app/code directory.
- Create a new folder for your module there for example, Vendor/Module:
mkdir -p Vendor/Module
- After you have created the folder for the module, create Necessary Directories and Files. For this you will need to create ‘registration.php’ file inside ‘vendor/module’.
<?php
MagentoFrameworkComponentComponentRegistrar::register(
    MagentoFrameworkComponentComponentRegistrar::MODULE,
    'Vendor_Module',
    __DIR__
); - Create the ‘etc’ directory and ‘module.xml’ file:
<?xml version="1.0"?>
<config xmlns:xsi="http://www.w3.org/2001/XMLSchema-instance" xsi:noNamespaceSchemaLocation="urn:magento:framework:Module/etc/module.xsd">
<module name="Vendor_Module" />
</config>
3- Modify Layout Files
- In order to modify the layout files, you will need to create ‘view/frontend/layout’ directory in your above-created module by following this path.
mkdir -p Vendor/Module/view/frontend/layout
- Create or modify the ‘checkout_index_index.xml’ layout file to customize the checkout page by following this
<?xml version="1.0"?>
<page xmlns:xsi="http://www.w3.org/2001/XMLSchema-instance" xsi:noNamespaceSchemaLocation="urn:magento:framework:View/Layout/etc/page_configuration.xsd">
<body>
<!-- Your customizations here -->
</body>
</page>
4- Add JavaScript File
- For adding the JavaScript file, you will need to add a new module directory so that you can store all your custom files. It is important to note that it would be best to add this step as a UI component and JS module.
mkdir -p Vendor/Module/view/frontend/web/js/view
- The next step is to Create a JavaScript file for the view model, e.g., custom-step.js:
define([
    'ko',
    'uiComponent',
    'Magento_Checkout/js/model/step-navigator'
], function (ko, Component, stepNavigator) {
    'use strict';

    return Component.extend({
        defaults: {
            template: 'Vendor_Module/checkout/custom-step'
        },
        initialize: function () {
            this._super();
            stepNavigator.registerStep(
                'custom-step',
                null,
                'Custom Step',
                this.isVisible,
                _.bind(this.navigate, this),
                15
            );
            return this;
        },
        isVisible: ko.observable(true),
        navigate: function () {
            // Navigation logic
        }
    });
});
5- Create and add an .HTML Template
- Create the template file in the ‘view/frontend/web/template/checkout’ directory, e.g., ‘custom-step.html’:
<div class="custom-step">
<!-- Custom step content here -->
<h2>Custom Checkout Step</h2>
</div>
6- Add the Step to the Checkout Page Layout
- For this you will need to Update the checkout_index_index.xml layout file to include the new step component:
<?xml version="1.0"?>
<page xmlns:xsi="http://www.w3.org/2001/XMLSchema-instance" xsi:noNamespaceSchemaLocation="urn:magento:framework:View/Layout/etc/page_configuration.xsd">
<body>
<referenceContainer name="content">
<uiComponent name="checkout">
<argument name="jsLayout" xsi:type="array">
<item name="components" xsi:type="array">
<item name="checkout" xsi:type="array">
<item name="children" xsi:type="array">
<item name="steps" xsi:type="array">
<item name="children" xsi:type="array">
<item name="custom-step" xsi:type="array">
<item name="component" xsi:type="string">Vendor_Module/js/view/custom-step</item>
<item name="sortOrder" xsi:type="number">15</item>
</item>
</item>
</item>
</item>
</item>
</item>
</argument>
</uiComponent>
</referenceContainer>
</body>
</page>
7- Remove a Component
- If you want to remove a component from the checkout process, you can create a plugin director under Vendor/Module and a plugin class, e.g., RemoveComponent.php:
<?php
namespace VendorModulePluginCheckoutBlockCheckout;
class RemoveComponent
{
public function aroundProcess(
MagentoCheckoutBlockCheckoutLayoutProcessor $subject,
Closure $proceed,
array $jsLayout
) {
        $jsLayout = $proceed($jsLayout);
        // Remove specific component
        if (isset($jsLayout['components']['checkout']['children']['steps']['children']['shipping-step'])) {
            unset($jsLayout['components']['checkout']['children']['steps']['children']['shipping-step']);
        }
        return $jsLayout;
}
}
Next, declare the plugin in ‘etc/di.xml’:
<?xml version="1.0"?>
<config xmlns:xsi="http://www.w3.org/2001/XMLSchema-instance" xsi:noNamespaceSchemaLocation="urn:magento:framework:ObjectManager/etc/config.xsd">
<type name="MagentoCheckoutBlockCheckoutLayoutProcessor">
<plugin name="vendor_module_remove_component" type="VendorModulePluginCheckoutBlockCheckoutRemoveComponent"/>
</type>
</config>
8- Update Styles
- If you want to edit, modify, or update the CSS style, create the view/frontend/web/css directory
mkdir -p Vendor/Module/view/frontend/web/css
- Add your custom CSS file, e.g., ‘custom-checkout.css’:
.custom-checkout-class {
/* Your custom styles */
} - Make sure that all your files are loaded; Update your layout file (checkout_index_index.xml) to include your CSS
<page xmlns:xsi="http://www.w3.org/2001/XMLSchema-instance" xsi:noNamespaceSchemaLocation="urn:magento:framework:View/Layout/etc/page_configuration.xsd">
<head>
<css src="Vendor_Module::css/custom-checkout.css"/>
</head>
<body>
<!-- Your customizations here -->
</body>
</page>
9- Deployment
Once you have followed the above processes and made the changes to JavaScript, CSS, or HTML files, deploy the static content.
php bin/magento setup:static-content:deploy
10- Clear Cache
Now, clear the cache to apply your changes.
bin/magento setup:upgrade
php bin/magento cache:clean
11- Test Your Customizations
Thoroughly test all aspects of the checkout process to ensure that your Magento 2 checkout customizations are functioning as intended. Check for any errors or issues that may arise by reviewing the browser console and Magento logs.
Why Customized Checkout Page is Important?
Customizing your checkout page has proven to be beneficial for the business when it comes to sales and revenue. Improving your checkout page or utilizing Magento 2 checkout customization process is important for the ecommerce business and online stores in many ways. Let’s take a look.
- It reduces cart abandonment, streamlines the checkout process with clear layouts, visible costs, and guest checkout options that keeps user retained.
- It helps in improving conversion rates by personalizing the checkout to encourage purchases with upsells, cross-sells, and loyalty program reminders.
- It enhances customer experience by creating a Magento 2 Checkout Customization with order tracking, delivery estimates, and personalized messages to foster loyalty.
- It is essential for data-driven optimization, A/B testing and data analysis to refine checkout elements, address friction points, and improve conversion rates.
Get Custom Magento Development Services
Improve your sales and reduce your cart abonnement rate with our custom Magento 2 development services that create a custom Magento 2 checkout customization experience for your customers. Our certified Magento developers specialize in back end and front-end development, creating tailored themes and storefronts, and creating seamless user experience.
Get in touch with us today to increase your sales and reduce the checkout abandonment rate.